

Digital Patterning ROI (and case study) For Non Financial People Part 3 of 3
A complete case study of how to do it, how long it takes, and the ROI.
You asked, we listened. This post is the the 3rd in our series on Digital Patterning ROI. It is one of the most requested pieces of content in our polling. We hope you find it informative

- In a world where speed and flexible real-time editing wins, legacy hand patterning lags behind.
- Those who adopt digital patterning practices secure jobs for themselves and advantage for their company.
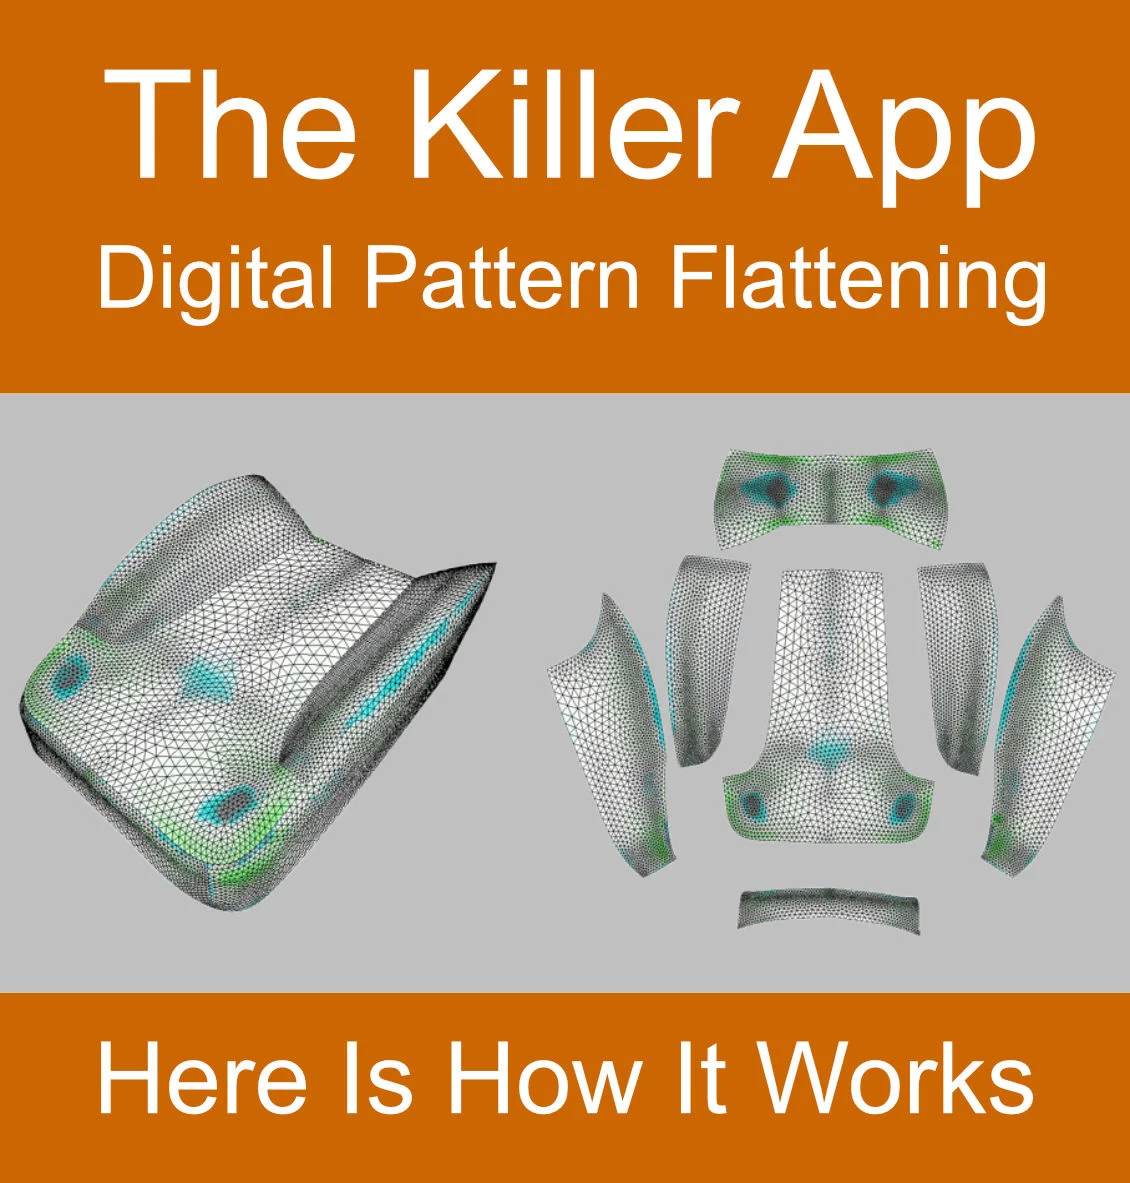
- We extend our digital patterning example to include 3D modelling so you can get a more complete picture of the ROI and extended workflow.
What’s the problem anyway?
- Legacy hand patterning uses a hodgepodge of different un-linked processes and tools. This makes it slow.
- Digital patterning unifies and links the processes and reduces the toolset substantially. This makes it much faster and less expensive.
- If you are able to see the entire workflow it makes it easier to understand the advantages.
The Hand Patterning Context

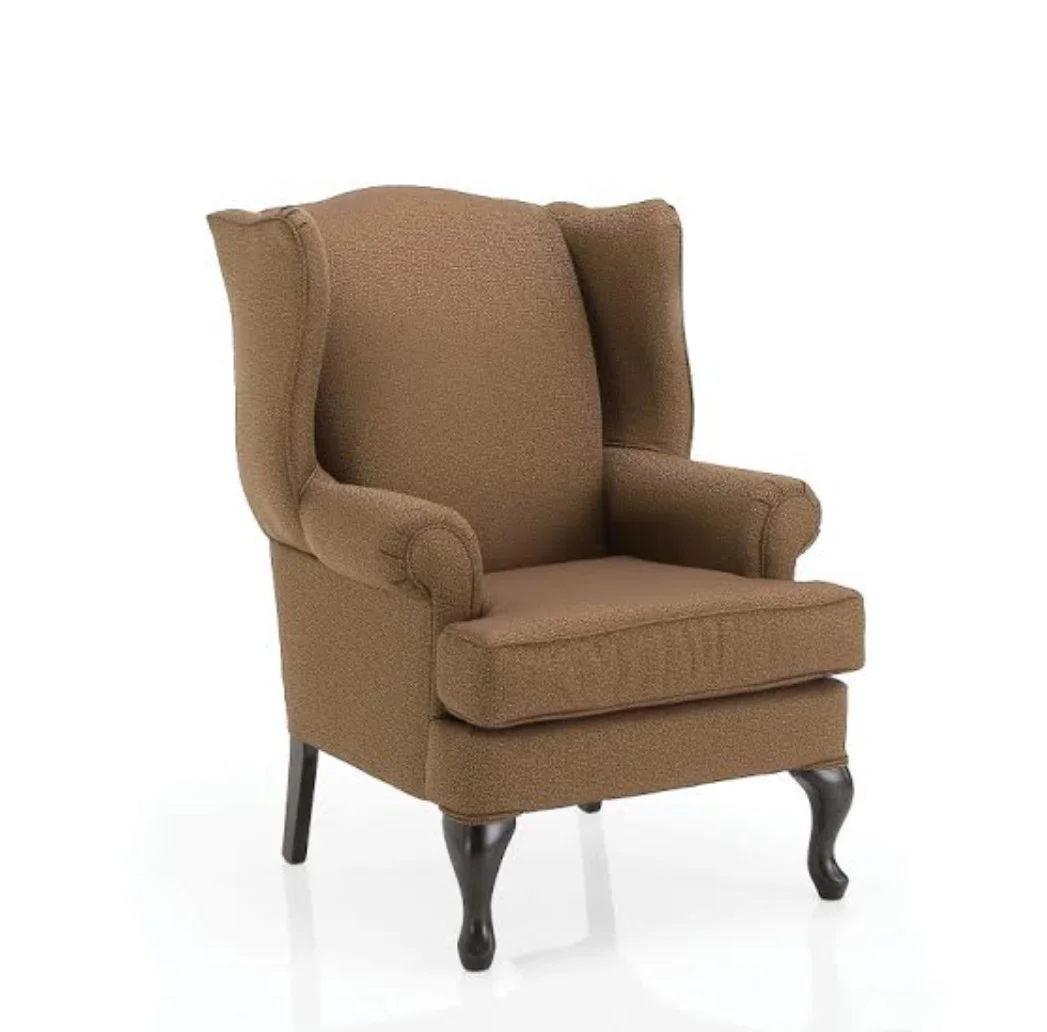
We are going to make a fabric cover for a speed boat. The boat is designed in 3D CAD as just about every single boat would be today. The current legacy hand patterning process involves the following steps and can take from 10 - 18 hours of effort.
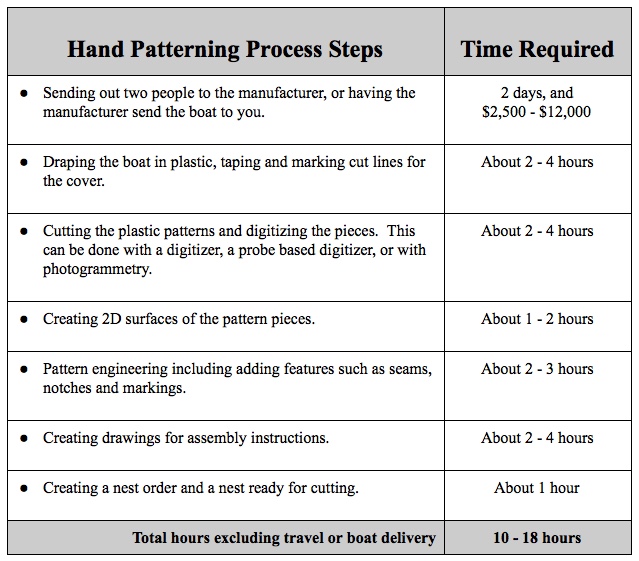
The cost range, assuming a labour rate of $40 per hour is between $400 - $720 plus the cost of getting to the boat, which while significant, we are going to ignore in our example.
The Digital Patterning Context
The digital patterning process starts with a 3D CAD file and involves the following steps
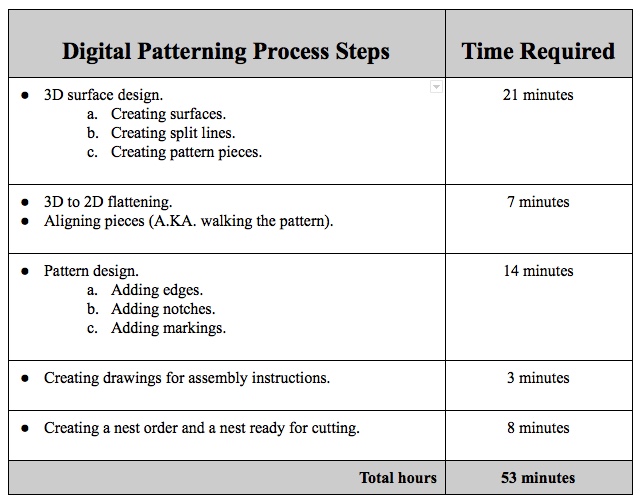
The labor cost for creating the patterns digitally is about $40 ($40 per hour x 1 hour). We will save the ROI for the end, but here is how things stack up assuming you have two full-time pattern engineers and assuming we take the fastest hand patterning scenario.

Digital Patterning Process Review
Let’s now take a closer look at the digital patterning process and how it is able to achieve such a remarkable improvement in speed.
Create 3D Surface Design (21 Minutes)
SolidWorks was used as the primary surface modelling tool. The initial 3D dimensions were used as a reference to build a wire frame. Then surfaces were created from the wireframe. We were able to create all of the surfaces needed using a single tool (boundary surfaces). We used the knit feature to ensure that gaps are removed. Pieces are panelized using SolidWorks split lines. If pieces are too large, splines lines can be moved and pieces rebuilt.
Boundary Surfaces
The Boundary Surface tool is a very powerful tool that provides great flexibility. We will review details on how to use the selection manager, connectors, tangency types and visualization.
Knitting
We can use knit features to combine multiple surface bodies into a single surface body.
Split Lines
We panelize the surfaces using SolidWorks Split Lines.
Piece Creator
Piece creator allows the user to combine faces and surfaces into pieces. This tool cleans the document of reference surfaces and unneeded faces.
3D to 2D Flattening (7 Minutes)
We optimize the piece shapes using material properties. The digital patterning features shown are for ExactFlat an add-in for SolidWorks:
- Pieces created using smooth spline curves.
- Multithreading allows rapid solutions to be provided.
- Curvature based meshing allows small details to be accurately preserved.
Convert to ExactFlat
The convert to sewn product creates meshes, flattens and creates a 2D surface body using smooth splines. We flatten the panels created in the 3D design.
The Material Tool
The material tool allows the user to assign ExactFlat material properties to pieces. In this example, we assign pieces to a lining material and a primary material.
Meshing and Remeshing
We will adjust meshing parameters and examine the results.
Optimization
Pattern pieces are optimized for shape and pattern edges are created using smooth spline curves
Pattern Design (14 Minutes)
We walked the pieces into a flat pattern arrangement. Seam allowance and notches are added to the pieces, markings and grain lines are applied.
Find
Pattern piece are walked into a layout using the find tool.
Seam
Seam allowances, sewing sequence and notches are created using seams and hems.
Notches
Notches can be applied as single notches or in notch chains.
Markings
Internal geometry is created using the markings tool. Sew lines for patches, vent and hardware details can be added using SolidWorks sketches.
Grain Lines
Grain lines allow the user to quickly define material direction on a piece. Markers are automatically updated when a grain line is revised.
- Multi-V and multi-slit notches can be defined and used easily.
- Length ratios are displayed in the seam tool.
- Pattern edges can be manually updated by manipulating the spline curves.
- Features are parametric. Notches move on both pieces, respace upon manual pattern edits.
- Features such as vent cutouts and cleat pockets can be designed using blocks.
Drawings (3 Minutes)
A mini drawing is created using piece callouts.
Piece Callouts
We place a pattern view and label the pieces using piece callouts. We then save as a pdf. Documentation is linked to the part model. If a part changes, the mini drawing will be updated.
Nesting (8 Minutes)
We automatically create a nest for each material in the design. In this comparison, the automatic nester achieved markers lengths as follows:
- Primary Material: 16.71m (ExactFlat) vs. 16.75m (benchmark)
- Lining Material: 4.32m (ExactFlat) vs. 4.58m (benchmark)
Using automatic marker making, time required is a fraction of manual marker making. Also a cost within .5% of the benchmark is generated for the marker after only 3 seconds.
Digital Patterning Is Fast and Easy
Fortunately, with basic 3D CAD skills, digital patterning is easy. The examples above show rather demonstratively that digital patterning is also much faster. Fast and easy are compelling reasons to go digital. However the real reason to go digital is because of the impact on the company bottom line. Lets put our example above in an ROI frame.
ROI
We are going assume, no previous 3D investments so to start digital patterning, we will include 3D CAD software, 5 days of CAD training, digital patterning and 4 hours of digital patterning training (yes, that is enough for most.) Here is how the numbers look with a very short 6 month amortization of the cost.

Where do you go from here?
If you want to try digital patterning for yourself, you can get a free trial by clicking the image below.